The accounts component allows you to configure a request that fetches a list of accounts that the user has access to. It is great when a single authenticated user can have access to multiple different accounts, and you want to use the account information later in data fetching requests.
For example, a Google Ads user might have access to multiple ad accounts under their organization, and in order to get the campaign performance data from the API, an account ID needs to be specified in the request.
Note
If the data source does not support having multiple accounts accessible by one user, or you don’t need these accounts to be fetched programmatically, you don’t need to include accounts component in your configuration.
How accounts are shown in Supermetrics products
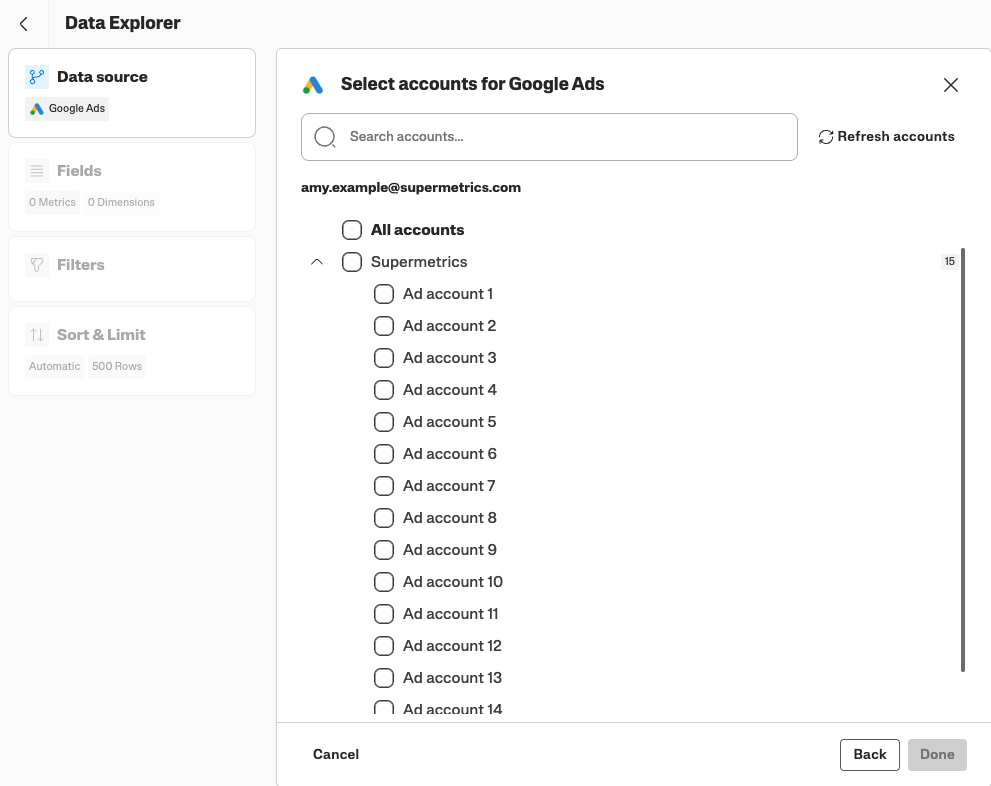
A list of accounts the user has access to is fetched after the user authenticates to the connector, and is shown when configuring a query. Here is what it looks like in our Google Ads connector:
Configuring accounts
To programmatically fetch the list of accounts the user has access to from the data source API, we need to configure accounts component and one or multiple account fetchers under it.
Account fetcher has two main elements:
requestdefines what kind of API request is made to fetch a list of accounts.Note: this request is executed automatically when the user authenticates to the connector, or when they click Refresh accounts within Supermetrics product.
accountInfodefines what data is stored for accounts (similar to user info under data source user)
Additionally, the displayed account fetcher’s label can be controlled through the configuration. By default the fetcher is displayed as Account / Accounts. To change that label, you can add terms object under the accounts component.
"accounts": {
    "hasAccounts": true,
    "terms": {
      "singular": "Ad account",
      "plural": "Ad accounts"
    },
    "fetchers": [
      {
        ...
      }
    ]
  }
Example
Let’s use the Spotify Ads API as an example again, where it provides an endpoint to fetch a list of ad accounts to which the authenticated user has access.
To get a list of ad accounts, you need to make a request to the Spotify Ads API with the following details:
GETrequest to a URLhttps://api-partner.spotify.com/ads/v3/businesses/[business_ID]/ad_accountsUse header
Authorizationwith valueBearer: [access token]in the request
And the response from Spotify API looks like this:
{
  "ad_accounts": [
    {
      "id": "ce4ff15e-f04d-48b9-9ddf-fb3c85fbd57a",
      "business_id": "ce4ff15e-f04d-48b9-9ddf-fb3c85fbd57a",
      "created_at": "2026-01-23T04:56:07Z",
      "updated_at": "2026-01-23T04:56:07Z",
      "country_code": "US",
      "industry": "Media & Entertainment",
      "website": "https://www.spotify.com",
      "billing_address": {
        "name": "Entity_1",
        "street": "123 Spotify Avenue",
        "city": "Los Angeles",
        "region": "California",
        "postal_code": "90210",
        "tax_region": "ES"
      },
      "legal_entity_name": "Spotify AB",
      "status": "ACTIVE",
      "status_reason": "string",
      "name": "Nike SB",
      "ad_account_role": "AD_ACCOUNT_ADMIN",
      "tax_id": "ATU82660371",
      "currency_code": "USD"
    }
  ]
}
Now, lets’s create an account fetcher and define that same request in the connector.
Account fetcher
We’ll first configure accounts component with fetchers array and one fetcher under it:
  "accounts": {
    "hasAccounts": true,
    "terms": {
      "singular": "Ad account",
      "plural": "Ad accounts"
    },
    "fetchers": [
      {
        ...
      }
    ]
  }
Requesting accounts
Next, we need to configure a request to the Spotify Ads API to fetch get a list of accounts. This is done with the same request object that we’ve used in other parts of the connector as well.
GETrequest to URLhttps://api-partner.spotify.com/ads/v3/businesses/{{user.properties.business_id}}/ad_accountsHere we assume we’ve stored
business_idas a property under data source user, and we use it with a placeholder
Authorizationheader where the value is user’s access token applied using a placeholderresponseobject where we define the response to beJSONformatted, and the JSONpath to the place in the response where the relevant data is:$.ad_accounts.*
  "accounts": {
    "hasAccounts": true,
    "terms": {
      "singular": "Ad account",
      "plural": "Ad accounts"
    },
    "fetchers": [
      {
        "request": {
          "method": "GET",
          "url": "https://api-partner.spotify.com/ads/v3/businesses/{{user.properties.business_id}}/ad_accounts",
          "headers": [
            {
              "name": "Authorization",
              "value": "{{user.access_token}}"
            }
          ],
          "response": {
            "type": "JSON",
            "dataRows": {
              "source": "jsonPath",
              "value": "$.ad_accounts.*"
            }
          }
        }
      }
    ]
  },
Configuring accountInfo
After we’ve defined how the list of accounts is requested, we can move on to define what information is stored for each account returned by the API. That will be configured using accountInfo object.
Each account needs to have at least the following defined:
idallowing us to identify each accountlabelto act as a display name and be shown to the user in the UI
In addition, you can also configure additional properties as many as you like. We will be configuring:
idto be read fromidfield on the responselabelto be read fromnamefield on the responseadditional
statusproperty to be read fromstatusfield of the response.
The configuration would look like this:
  "accounts": {
    "hasAccounts": true,
    "terms": {
      "singular": "Ad account",
      "plural": "Ad accounts"
    },
    "fetchers": [
      {
        "request": {
          "method": "GET",
          "url": "https://api-partner.spotify.com/ads/v3/businesses/{{user.properties.business_id}}/ad_accounts",
          "headers": [
            {
              "name": "Authorization",
              "value": "{{user.access_token}}"
            }
          ],
          "response": {
            "type": "JSON",
            "dataRows": {
              "source": "jsonPath",
              "value": "$.ad_accounts.*"
            }
          }
        },
        "accountInfo": {
          "id": {
            "source": "jsonPath",
            "value": "$.id"
          },
          "label": {
            "source": "jsonPath",
            "value": "$.name"
          },
          "properties": [
            {
              "id": "status",
              "source": "jsonPath",
              "value": "$.status"
            }
          ]
        }
      }
    ]
  },
And now you have configured a successful account fetcher into your connector!
Using account information in requests
Now when we have accounts fetched and stored, it’s time to use those accounts in reporting requests.
You can use any of the information stored about accounts within the request object that you define under reporting. This is achieved by applying an account placeholder to either the URL, headers, body, or request parameters.
Account placeholders have a format {{account.id}} or {{account.label}} for id and label, or format {{account.properties.*}} where the asterisk * is replaced with the property ID for any additional properties you configured.
An example request configuration, where the account ID is used within the request URL, could look like this:
"request": {
  "method": "GET",
  "url": "https://api-partner.spotify.com/ads/v3/ad_accounts/{{account.id}}/insight_reports",
  "response": {
    ...
    }
  }
}